Guides
Step-by-step instructions for setup, extension, and operations.
Prerequisites
| Requirement | Install | Verify |
|---|---|---|
| Azure CLI | brew install azure-cli | az --version |
| Azure Developer CLI | brew install azd | azd version |
| Docker or Podman | brew install --cask docker | docker --version |
| Python 3.11+ | brew install python@3.11 | python3 --version |
| Node.js 18+ | brew install node | node --version |
| Azure Subscription | With Contributor access | az account show |
Azure OpenAI access: You need GPT-4o or GPT-4o-mini deployed in a supported region. The azd up command handles this provisioning.
Deploy to Azure
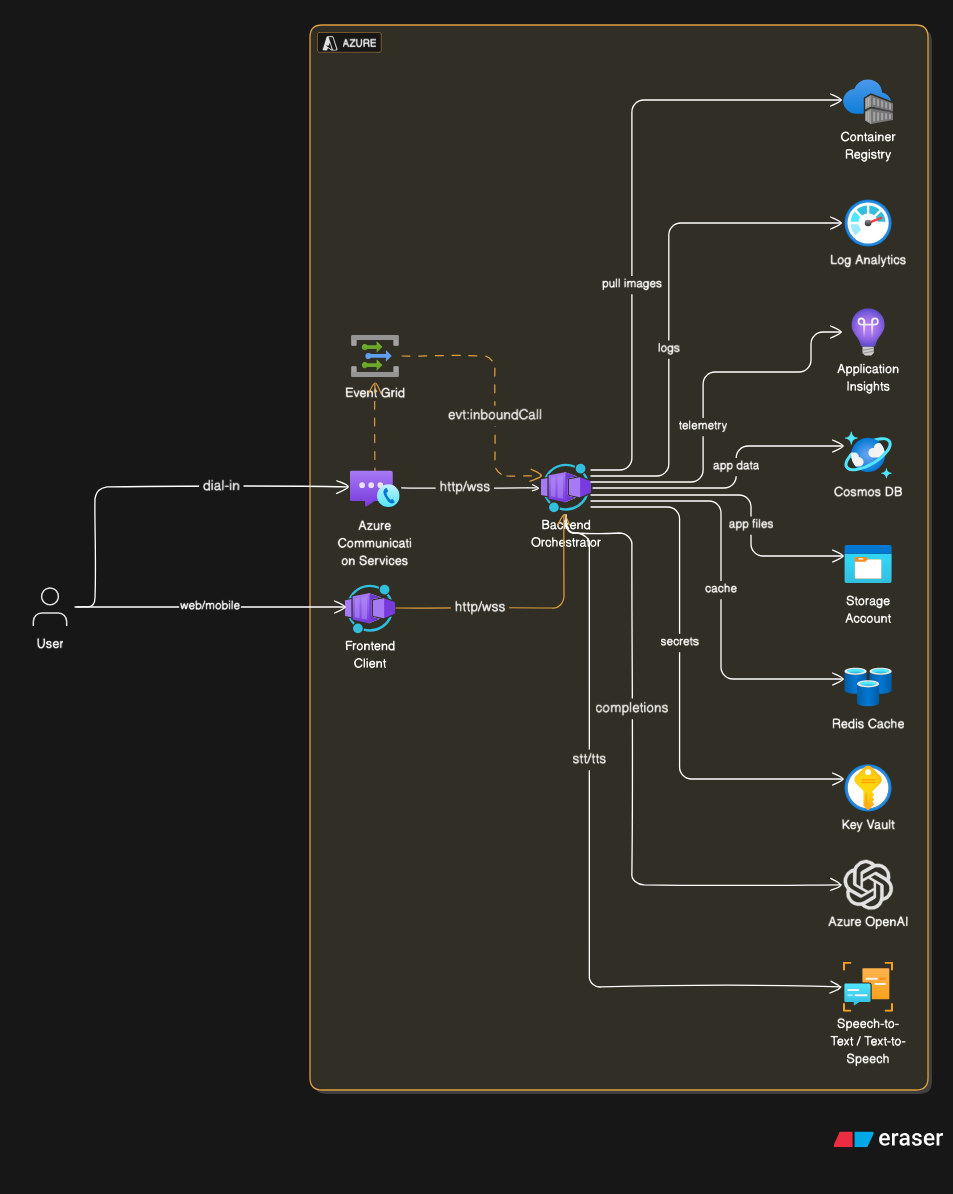
One command deploys everything: infrastructure, backend, frontend.
azd up — Terraform/Bicep IaC# 1. Clone and enter the repo
git clone https://github.com/Azure-Samples/art-voice-agent-accelerator.git
cd art-voice-agent-accelerator
# 2. Login
az login
azd auth login
# 3. Deploy (~25 min total)
azd upWhat azd up creates:
| Resource | Purpose |
|---|---|
| Azure OpenAI | GPT-4o for conversations |
| Azure Speech Services | STT and TTS processing |
| Azure Communication Services | Telephony and media streaming |
| Cosmos DB | Conversation persistence |
| Azure Redis | Session state |
| Container Apps (×2) | Backend + Frontend hosting |
| Storage Account | Blob storage for app files |
| App Configuration | Dynamic configuration |
| Application Insights | Monitoring and tracing |
After deployment, azd prints the frontend URL. Open it to start a conversation.
Enable Phone Calling (ACS)
azd up provisions the Azure Communication Services (ACS) resource, but it does not buy a phone number or wire up call routing for you — those are deliberate, billable, one-time steps. To receive inbound PSTN calls you need to do three things: (1) purchase a phone number, (2) point an Event Grid subscription at your backend so ACS knows where to deliver the call, and (3) let the backend answer it.
How an inbound call reaches your agent
When someone dials your ACS number, ACS doesn't talk to your backend directly. It raises an IncomingCall event to Azure Event Grid, which fans that event out to whatever webhook you've subscribed. That webhook is a single backend endpoint:
POST https://<your-backend-host>/api/v1/calls/answerThat same endpoint does double duty: it answers Event Grid's one-time SubscriptionValidationEvent handshake and handles the runtime Microsoft.Communication.IncomingCall events. The flow:
- Caller dials your purchased ACS number.
- ACS emits a
Microsoft.Communication.IncomingCallevent to Event Grid. - Event Grid delivers that event to your subscribed webhook (
/api/v1/calls/answer). - The backend answers the call, opens the media WebSocket, and the orchestrator starts the conversation.
The one URL that matters: /api/v1/calls/answer. In production this is your Container App's public FQDN; in local dev it's your dev tunnel URL (see Dev tunnel below). Everything in this section is about getting ACS to deliver IncomingCall events to that path.
Step 1 — Purchase a phone number in ACS
Buy a number directly on the ACS resource that azd up created.
Via the Azure Portal:
- Open the Azure Portal → your Communication Services resource.
- In the left menu under Telephony and SMS, select Phone numbers → + Get.
- Choose Country/Region (e.g. United States), number type Toll-free or Local, and enable the Calling — Make & receive calls capability (inbound is what you need to receive calls).
- Search, select an available number, review the monthly + per-minute pricing, and Place order.
Heads up: phone numbers are billed (a monthly lease plus usage), and toll-free numbers may require a one-time regulatory / verification review before they can carry traffic. Buy the number early so the verification clears before you demo.
Via the Azure CLI (the communication extension installs on first use):
# Search for an available toll-free US number with inbound calling
az communication phonenumber search-available \
  --resource-group <your-rg> \
  --communication-service <your-acs-name> \
  --country-code US \
  --phone-number-type tollFree \
  --assignment-type application \
  --calling-capabilities inbound

# Purchase using the search-id returned above
az communication phonenumber purchase \
  --resource-group <your-rg> \
  --communication-service <your-acs-name> \
  --search-id <search-id>

# Confirm the number is on the resource
az communication phonenumber list-purchased \
  --resource-group <your-rg> \
  --communication-service <your-acs-name>
Step 2 — Route the call: create an Event Grid subscription
This is the step that connects ACS to your backend. You're subscribing to the ACS resource's IncomingCall events and telling Event Grid to deliver them to your /api/v1/calls/answer webhook.
Via the Azure Portal:
- Open your Communication Services resource → Events (left menu) → + Event Subscription.
- Name it (e.g.
incoming-call-to-backend). - Under Filter to Event Types, select only
Incoming Call(Microsoft.Communication.IncomingCall). Deselecting the rest keeps noise off your webhook. - Set Endpoint Type = Web Hook.
- For Endpoint, paste your backend's answer URL:
Production (Container App FQDN)
https://<your-backend>.<region>.azurecontainerapps.io/api/v1/calls/answer - Click Create. Event Grid immediately fires a
SubscriptionValidationEventto that URL; the backend's/answerendpoint auto-completes the handshake, so the subscription goes green within a few seconds. If it stays in a failed/validating state, your endpoint wasn't reachable — see the troubleshooting note below.
Via the Azure CLI:
# Resolve the ACS resource ID (the Event Grid "source")
ACS_ID=$(az communication show \
  --name <your-acs-name> \
  --resource-group <your-rg> \
  --query id -o tsv)

# Subscribe IncomingCall events → backend /api/v1/calls/answer
az eventgrid event-subscription create \
  --name incoming-call-to-backend \
  --source-resource-id "$ACS_ID" \
  --endpoint "https://<your-backend>.<region>.azurecontainerapps.io/api/v1/calls/answer" \
  --endpoint-type webhook \
  --included-event-types Microsoft.Communication.IncomingCall
Validation must succeed or no calls flow. Event Grid only delivers IncomingCall events after the one-time validation handshake completes. The backend must be running and publicly reachable at the moment you create the subscription. If the endpoint is down, the subscription will fail and you'll need to re-create it once the backend is up.
Step 3 — Verify
- Confirm the Event Subscription shows Provisioning state: Succeeded under Events on the ACS resource.
- Call your purchased number from any phone.
- Watch the backend logs — you should see the
SubscriptionValidationEvent(once, at creation) and then aMicrosoft.Communication.IncomingCallevent followed by the call being answered.
Local development — making ACS reach your laptop
In production the webhook is a public Container App URL, so ACS can reach it. On your laptop, http://localhost:8010/api/v1/calls/answer is invisible to Azure. The fix is exactly the same three steps above, with one change: the Endpoint you give the Event Grid subscription is your dev tunnel URL instead of the Container App FQDN:
https://abc123-8010.usw3.devtunnels.ms/api/v1/calls/answerThe dev tunnel gives localhost:8010 a public, internet-routable HTTPS address that ACS can deliver events to. See Dev tunnel — enabling telephony on your laptop for setup, and remember to update both the Event Grid subscription endpoint and the backend BASE_URL whenever you create a fresh tunnel.
Re-create the subscription when the tunnel ID changes. Each new devtunnel create mints a new random URL. An Event Grid subscription pinned to a dead tunnel silently drops every IncomingCall event. Either keep a stable tunnel for the day or update/re-create the subscription endpoint after each rotation.
Genesys Cloud Integration
The accelerator ships with a built-in Genesys Cloud AudioConnector bridge, so you can put the same multi-agent voice orchestrator behind a Genesys contact-center flow without Azure Communication Services or a PSTN number. Genesys streams the live call audio to the backend over a WebSocket, the backend runs the conversation through Azure VoiceLive and the agent/tool/handoff stack, and synthesized speech streams back to the caller — all in real time.
This is an alternative telephony front-end that sits alongside the ACS path above. ACS and Genesys share the exact same agents, tools, scenarios, and handoff logic; only the audio transport differs.
When to use this: you already run Genesys Cloud as your contact-center platform and want to route a queue, IVR branch, or a single flow action to an Azure AI voice agent. Genesys owns the PSTN leg and caller experience; the accelerator provides the AI brain.
How it works
Genesys Cloud's AudioConnector integration speaks the AudioHook v2 WebSocket protocol. The accelerator implements the full server side of that protocol and bridges it to Azure VoiceLive:
Architect flow"] end subgraph ART["⚙️ ART Backend — /api/v1/genesys/stream"] direction TB proto["AudioHook v2 protocol
handshake · seq · ping · DTMF · barge-in"] codec["Audio codec
µ-law 8kHz ⇄ PCM16 24kHz"] handler["GenesysVoiceLiveHandler"] proto --- handler codec --- handler end subgraph CORE["🧠 Shared multi-agent core (same as ACS)"] direction TB orch["LiveOrchestrator"] agents["Agents · Tools · Handoffs"] memo["MemoManager
Redis session + caller context"] orch --- agents orch --- memo end vl["Azure VoiceLive API
STT · LLM · TTS (managed)"] gc <== "WebSocket · µ-law 8kHz + JSON" ==> proto handler <== "PCM16 24kHz · base64" ==> vl handler --> orch classDef callerNode fill:#FFFFFF,stroke:#605E5C,color:#1A1A1A classDef gNode fill:#FFF8E1,stroke:#C8960A,color:#3D2F00 classDef aNode fill:#E3F0FF,stroke:#0078D4,color:#0A2540 classDef cNode fill:#E6FAEA,stroke:#107C10,color:#0B3D0B classDef vNode fill:#F1E6FF,stroke:#8764B8,color:#2E1A47 class caller callerNode class gc gNode class proto,codec,handler aNode class orch,agents,memo cNode class vl vNode style GENESYS fill:#FFFBF0,stroke:#FFB900,color:#3D2F00 style ART fill:#F0F7FF,stroke:#0078D4,color:#0A2540 style CORE fill:#F0FBF2,stroke:#107C10,color:#0B3D0B
The bridge does three jobs on every call:
- Protocol — Implements the AudioHook v2 server handshake (
open/opened), keep-alive (ping/pong), sequence-number tracking, DTMF, barge-in, and gracefulclose/disconnect. - Audio codec — Genesys sends µ-law (PCMU) 8 kHz mono; VoiceLive expects PCM16 24 kHz. The handler decodes + upsamples 3× inbound, and downsamples + µ-law encodes outbound, with paced 250 ms chunking back to Genesys.
- Orchestration — On session open it connects to VoiceLive, resolves the same agent set / scenario / handoff map used by the ACS path, and starts the
LiveOrchestrator. Caller context from the Genesys flow is injected into the agent's working memory.
Genesys is VoiceLive-only today. Unlike the ACS path (which honors ACS_STREAMING_MODE and can run the SpeechCascade orchestrator), the Genesys bridge is wired exclusively to Azure VoiceLive via GenesysVoiceLiveHandler → LiveOrchestrator — there is no SpeechCascade code path for Genesys. This keeps end-to-end latency lowest for contact-center traffic. Your VoiceLive settings must be configured (see Step 1) regardless of what ACS_STREAMING_MODE is set to. The agents, tools, and handoff logic are identical to the cascade path, so the same scenarios work either way.
What the accelerator gives you out of the box
The integration is already wired into the backend — there is nothing to build. Once the backend is running it exposes:
| Endpoint | Type | Purpose |
|---|---|---|
/api/v1/genesys/stream | WebSocket | AudioHook v2 audio + control stream (subprotocol audiohook-v2) |
/api/v1/genesys/health | GET | Liveness check — returns {"status":"ok","service":"genesys-audiohook"} |
Caller context configured as input variables on the Genesys AudioConnector action is delivered in the open message and made available to your agents. A few well-known keys are promoted to system variables; all input variables are also stored in the session's working memory (MemoManager) so tools and prompts can read them:
| Genesys input variable | Exposed to agents as | Notes |
|---|---|---|
phoneNumber | caller_phone | Caller's number from the Genesys flow |
emailAddress | caller_email | Caller email, if collected |
promptName | genesys_prompt | Scenario / prompt hint from the flow |
| any other key | working memory | Stored verbatim in MemoManager for the session |
Step 1 — Configure Azure VoiceLive
The bridge connects to Azure VoiceLive on session open, so these must be set in the backend environment (they are populated by azd up when VoiceLive is provisioned):
# Azure VoiceLive — required for the Genesys bridge
AZURE_VOICELIVE_ENDPOINT=https://<your-voicelive-resource>.cognitiveservices.azure.com
AZURE_VOICELIVE_MODEL=gpt-4o-realtime-preview

# Auth: managed identity (recommended) OR an API key
USE_DEFAULT_CREDENTIAL=true
# AZURE_VOICELIVE_API_KEY=<key>   # only if not using managed identity

# Recommended: Redis-backed session memory so caller context + handoffs persist
REDIS_HOST=<your-redis-host>
REDIS_PORT=6380
Step 2 — Point Genesys at your endpoint
In Genesys Cloud Admin, create an AudioConnector integration and set its connection URI to your backend's Genesys WebSocket endpoint (always wss:// — Genesys requires TLS):
wss://<your-backend>.<region>.azurecontainerapps.io/api/v1/genesys/streamThen reference that integration from an Audio Connector action inside an Architect inbound call flow, and map any caller context you want the agent to receive into the action's input variables (e.g. phoneNumber, promptName). When a call hits that flow action, Genesys opens the WebSocket and the AI agent takes over the conversation.
Public, TLS, and reachable. Genesys Cloud connects from its own cloud infrastructure, so the endpoint must be a public wss:// URL. For local development, expose the backend through a dev tunnel and use the tunnel's wss:// address — exactly as you would for ACS, but pointing at /api/v1/genesys/stream.
Step 3 — Test without Genesys (simulator)
The repo ships a local AudioConnector simulator at tools/genesys_simulator/ that emulates a Genesys client end-to-end — it negotiates AudioHook v2, captures your microphone, streams µ-law audio, and plays the agent's response — so you can validate the full pipeline before touching real Genesys infrastructure.
# 1) Start the backend (if not already running)
python -m uvicorn apps.artagent.backend.main:app --host 0.0.0.0 --port 8081

# 2) Run the simulator against it
cd tools/genesys_simulator
python -m venv .venv && source .venv/bin/activate
pip install -r requirements.txt
python genesys_client_simulator.py ws://localhost:8081/api/v1/genesys/stream
Speak into your mic and you should hear the agent respond. See tools/genesys_simulator/README.md for configuration (prompt/scenario name, org/conversation IDs, and the input variables it sends).
What you should expect to see
A healthy call produces this log sequence in the backend (loggers api.v1.endpoints.genesys, genesys.protocol, and genesys.handler). Every line is tagged with the AudioHook session= so you can follow a single call:
[Genesys] WebSocket connect | session=<sid>
[Genesys] Handler started | session=<sid>
[GenesysProtocol] Session opened | conversation=<conv> org=<org> media={"format":"PCMU","rate":8000,...}
[Genesys] VoiceLive connected | connect_ms=312.4 session=<sid>
[Genesys] Agents resolved | count=8 start=Concierge session=<sid>
[Genesys] Orchestrator started | session=<sid>
[Genesys] User transcript: 'I want to check my balance' | session=<sid>
[Genesys] First audio chunk for response=<rid> | session=<sid>
[Genesys] Speech started → barge-in | session=<sid> # caller interrupted; playback stops- Handshake:
WebSocket connect→Session openedwithin a second. If you never seeSession opened, Genesys and the backend failed to agree on a media format. - Audio both ways:
VoiceLive connectedthenFirst audio chunkmeans the agent is talking back;User transcriptlines confirm inbound speech is being recognized. - Barge-in:
Speech started → barge-inappears when the caller interrupts the agent — the bridge tells Genesys to stop the current playback.
Debugging & troubleshooting via monitor logs
All Genesys activity flows through the standard OpenTelemetry → Application Insights pipeline (see Monitoring). Filter on the [Genesys] / [GenesysProtocol] tags or a specific session= to isolate one call.
Application Insights (Logs / KQL):
traces
| where timestamp > ago(1h)
| where message has "[Genesys]" or message has "[GenesysProtocol]"
| project timestamp, message, severityLevel, operation_Id
| order by timestamp asctraces
| where message has "session=<your-session-id>"
| order by timestamp ascContainer App live logs (Azure CLI):
# Tail the backend and filter to Genesys lines
az containerapp logs show \
  --name <your-backend-app> \
  --resource-group <your-rg> \
  --follow --tail 100 | grep -i genesys

# Quick liveness check of the Genesys endpoint
curl https://<your-backend>.<region>.azurecontainerapps.io/api/v1/genesys/health
Common issues — the log line in the right column tells you which stage failed:
| Symptom | Likely cause | What to check / log signal |
|---|---|---|
WebSocket connects, then drops right after open |
VoiceLive not configured or credential failure | Look for [Genesys] Failed to connect to VoiceLive. Verify AZURE_VOICELIVE_ENDPOINT/AZURE_VOICELIVE_MODEL and that the managed identity (or API key) can reach VoiceLive. |
No opened response / session never starts |
Media format mismatch | [GenesysProtocol] No supported media format found. The AudioConnector must offer PCMU @ 8000 Hz on the external channel. |
| Session rejected with a disconnect | Out-of-order or duplicate frames (proxy/network) | [GenesysProtocol] Invalid client seq or Session ID mismatch. Check for a proxy reordering WebSocket frames between Genesys and the backend. |
| Garbled, robotic, or sped-up audio | Codec conversion problem | Inspect the [Genesys] Audio delta: input_type=… → µ-law_size=… debug line. Confirm Genesys is sending 8 kHz µ-law mono. |
| Agent greets with the wrong persona / scenario | Scenario or start-agent resolution | [Genesys] Agents resolved | count=… start=… shows which agent set and start agent were selected. Adjust the promptName input variable or scenario config. |
| Caller context (phone/email) missing in the agent | Input variables not mapped, or Redis unavailable | Confirm the AudioConnector action sets inputVariables; without Redis (REDIS_*) the MemoManager is skipped and context isn't persisted across handoffs. |
| Calls connect locally with the simulator but not from Genesys | Endpoint not publicly reachable over TLS | Genesys requires a public wss:// URL. Use the Container App FQDN in production or a dev tunnel locally — pointed at /api/v1/genesys/stream. |
Local Development
Install dependencies
make install # Installs Python (pip) + Node (npm) dependenciesEnvironment setup
After azd up, a .env.local file is generated at the repo root with all connection strings. For local development, copy it to .env (which the backend loads by default):
cp .env.local .envDev tunnel — enabling telephony on your laptop
Why a dev tunnel is required. The voice agent is driven by Azure Communication Services (ACS), a cloud service that places phone calls and streams audio into your backend via webhooks (/api/v1/calls/answer, media WebSocket, etc.). localhost:8010 is invisible to Azure — ACS literally cannot reach it. A dev tunnel gives your laptop a public, internet-routable HTTPS URL that ACS can call into, which is what turns local development into a working PSTN endpoint.
Skip the tunnel and you'll still get a working browser UI, but no phone calls will connect and ACS event subscriptions will fail validation.
Use Azure Dev Tunnels:
# Install
brew install --cask devtunnel

# Login and create a tunnel with anonymous access (required for ACS — see below)
devtunnel user login
devtunnel create --allow-anonymous

# Expose backend port 8010 and start hosting
devtunnel port create -p 8010 --protocol https
devtunnel host
Copy the HTTPS URL it prints (e.g. https://abc123-8010.usw3.devtunnels.ms) — you'll wire it into BASE_URL below.
Securing the tunnel (RBAC + compensating controls)
The constraint: ACS webhooks are unauthenticated HTTPS POSTs from Azure infrastructure — ACS cannot present a user's Entra ID token to your tunnel. That means the tunnel path ACS hits must allow anonymous traffic, so you can't simply put Entra RBAC in front of the callback URL and call it a day. Instead, layer defenses around it.
1. Restrict who can create tunnels in your tenant
Tenant admins can lock down the Dev Tunnels service itself so only approved users (and only inside the corporate tenant) can host tunnels. From the Dev Tunnels security docs:
# Tenant admin: require Entra ID auth + restrict tunnel creation to a group
# (configured in the Entra admin center under Enterprise applications →
#  "Visual Studio Tunnel Service" → Users and groups + Conditional Access)
This doesn't protect the data plane that ACS hits, but it stops random tenants/users from spinning up tunnels that look like yours.
2. Treat the tunnel URL as a secret
Each tunnel ID is a high-entropy random string (e.g. abc123 in abc123-8010.usw3.devtunnels.ms). That ID is effectively a bearer secret for the callback path. Don't paste it in Teams, don't commit it, and rotate it often:
# Tear down at end of day
devtunnel delete <tunnel-id>

# Or recycle with a fresh ID
devtunnel create --allow-anonymous
3. Use Entra-restricted tunnels for non-ACS surfaces
If you also expose the frontend or an admin UI through a tunnel (i.e. anything a human in a browser consumes — not ACS), you can drop --allow-anonymous and add tenant- or user-scoped RBAC. Callers will be challenged for an Entra ID token before reaching your service:
# Create a tunnel with no anonymous access (default = owner only)
devtunnel create

# Grant your whole tenant access (members must sign in with Entra ID)
devtunnel access create <tunnel-id> --tenant <your-tenant-id>

# Or grant a specific user
devtunnel access create <tunnel-id> --user alice@contoso.com

# Inspect / revoke
devtunnel access list   <tunnel-id>
devtunnel access delete <tunnel-id> --access-id <id>
A common split-brain pattern: two tunnels per laptop — one anonymous tunnel exposing only the backend port for ACS callbacks, and one Entra-restricted tunnel exposing the frontend so only your tenant can load the UI.
4. Validate ACS callbacks at the application layer
Even with an anonymous tunnel, the backend should still verify incoming ACS events. The ACS Event Grid integration performs a one-time SubscriptionValidation handshake, and runtime events ship as CloudEvents 1.0 with a known schema — reject anything that doesn't match.
Bottom line: for the ACS callback path, anonymous + a random tunnel ID + short-lived tunnels is the realistic posture. Use Entra RBAC where it actually helps (tunnel creation, frontend/admin UIs), and never use a dev tunnel for anything beyond local development.
Wire BASE_URL into the backend .env
The backend reads BASE_URL as the public callback endpoint it gives to ACS for media streaming and call events. Edit the root .env:
# Public URL ACS uses to reach your backend (from `devtunnel host`)
BASE_URL=https://abc123-8010.usw3.devtunnels.ms
Every time you create a new tunnel, update this value — a stale BASE_URL is the #1 cause of dropped calls and 404 callbacks.
Wire the frontend .env
The frontend is a Vite/React app, so its environment variables are baked into the bundle at build time (Vite inlines anything prefixed VITE_ when npm run dev or npm run build starts). Changing this file requires restarting the Vite dev server.
Create apps/artagent/frontend/.env from the sample:
cp apps/artagent/frontend/.env.sample apps/artagent/frontend/.env# Local backend (default)
VITE_BACKEND_BASE_URL=http://localhost:8010
# Or, when testing the browser client against your dev tunnel:
# VITE_BACKEND_BASE_URL=https://abc123-8010.usw3.devtunnels.msUse localhost for normal browser-only development. Point it at the tunnel URL only when you need an external device (phone, another machine) to hit your backend through the browser UI.
Start the services
make start_backend    # FastAPI on http://localhost:8010
make start_frontend   # Vite dev server on http://localhost:5173
Create an Agent
Agents are YAML files — no Python required.
1. Create the agent directory
mkdir -p apps/artagent/backend/registries/agentstore/my_agent2. Define the agent
name: MyAgent
description: Handles widget inquiries
handoff:
  trigger: handoff_my_agent
greeting: "Hi! I can help with widget questions."
tools:
  - lookup_widget
  - handoff_concierge  # Always include a way back
prompts:
  path: prompt.jinja
3. Write the system prompt
You are a widget specialist for {{ company_name }}.
Help the caller find the right widget. Be concise and friendly.
If you can't help, use the handoff_concierge tool to transfer back.
4. Add to a scenario
start_agent: Concierge
handoffs:
  - from: Concierge
    to: MyAgent
    tool: handoff_my_agent
    type: announced
  - from: MyAgent
    to: Concierge
    tool: handoff_concierge
    type: discrete
The agent is auto-discovered on next restart. No registration code needed.
Add a Tool
Tools are Python functions registered in the centralized tool store.
from registries.toolstore.registry import register_tool
(
name="lookup_widget",
description="Look up widget details by SKU or name",
)
async def lookup_widget(query: str) -> dict:
# Your business logic here
return {"sku": "W-123", "name": "Premium Widget"}Rules: Always use @register_tool. Make tools async. Never define tools inline in agents. The tool is immediately available to any agent that lists it.
Create a Scenario
Scenarios define how agents connect. Same agents, different wiring.
name: my_scenario
description: Widget support flow
start_agent: Concierge
agents:
  - Concierge
  - MyAgent
  - AuthAgent
handoffs:
  - from: Concierge
    to: AuthAgent
    tool: handoff_auth_agent
    type: announced
  - from: AuthAgent
    to: MyAgent
    tool: handoff_my_agent
    type: discrete
agent_defaults:
  company_name: "Contoso Widgets"
Handoff types:
| Type | Behavior |
|---|---|
announced | Agent tells the caller they're being transferred |
discrete | Silent handoff — caller doesn't know |
Production Deployment
Checklist
| Category | Item |
|---|---|
| Identity | Use managed identity (not connection strings) for all Azure services |
| Networking | VNet integration, private endpoints for Redis/Cosmos/Speech |
| Scaling | Container Apps min replicas ≥ 2, scale on concurrent connections |
| Monitoring | Application Insights connected, alerts on latency & error rate |
| Secrets | Key Vault for any non-managed-identity credentials |
| Availability | Multi-region ACS, geo-redundant Cosmos, Redis HA |
Monitoring
The system emits OpenTelemetry traces through Application Insights.
Key metrics to watch
| Metric | What it means | Alert threshold |
|---|---|---|
| End-to-end turn latency | User speech end → response start | > 2 seconds |
| STT recognition time | Audio → transcript | > 500ms p95 |
| TTS first byte | Text → first audio chunk | > 300ms p95 |
| Active connections | Concurrent WebSocket sessions | > 80% of limit |
| Tool execution time | Function call duration | > 5 seconds |
Testing
Run tests
# Unit tests
make test

# With coverage
make test_coverage

# Load testing
make load_test
Test structure
| Type | Location | What it covers |
|---|---|---|
| Unit | tests/unit/ | Individual functions, agents, tools |
| Integration | tests/integration/ | API endpoints, WebSocket flows |
| Evaluation | tests/evaluation/ | LLM response quality, scenario correctness |
| Load | tests/load/ | Concurrent calls, latency under stress |
Troubleshooting
| Problem | Likely cause | Fix |
|---|---|---|
| No audio response | TTS client pool exhausted | Check /api/v1/pools for available clients. Increase pool size. |
| Agent not responding | Azure OpenAI rate limit | Check Application Insights for 429 errors. Increase TPM quota. |
| Call drops immediately | ACS callback URL unreachable | Verify BASE_URL in .env matches your current devtunnel host URL and the tunnel is still running. |
| Handoff loops | Circular handoff routes in scenario | Check orchestration.yaml for cycles. Each agent should have a clear return path. |
| High latency (> 2s) | Cold client connections | Ensure pools are warm. Check /api/v1/ready for warmup status. |
| Session state lost | Redis connectivity | Check Redis connection. Verify REDIS_* environment variables. |